Introduction:
Kitesurfing, a thrilling water sport that combines the adrenaline rush of surfing with the exhilaration of flying, has captivated enthusiasts around the world. One of the most exhilarating aspects of kitesurfing is performing jumps, which require a deep understanding of the wind window, power zone, and geometry. This article aims to delve into the intricacies of these elements, providing valuable insights for kitesurfers looking to master the art of jumping.

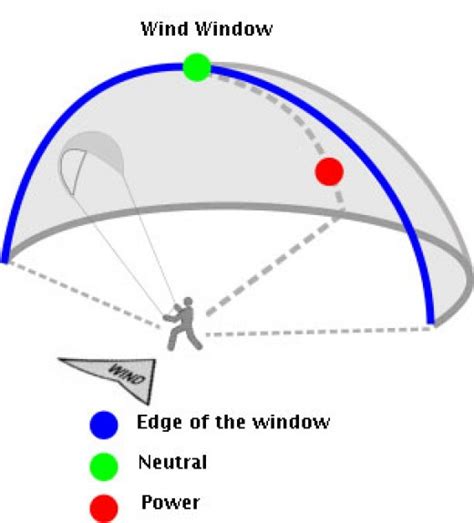
Understanding the Wind Window:
The wind window is the area between the kite and the rider, where the kite can generate lift and power. It is crucial to understand the geometry of the wind window to optimize jumping performance. The wind window is divided into three zones: the front, middle, and back.
1. Front Zone:
The front zone is the area directly in front of the kite. It is the most powerful part of the wind window, as it allows the kite to pull the rider forward with maximum force. To utilize the front zone effectively, riders should aim to position the kite as close to the front of the wind window as possible. This ensures maximum power and allows for higher and more sustained jumps.
2. Middle Zone:
The middle zone is located between the front and back zones. It provides a balance between power and control. Riders can use the middle zone to adjust their kite position for different jump styles, such as wakestyle or freestyle. The middle zone is ideal for executing rotations and maintaining stability during the jump.
3. Back Zone:
The back zone is the area behind the kite, where the wind window is less powerful. It is primarily used for landing and maintaining control during the jump. Riders should avoid staying in the back zone for extended periods, as it can lead to loss of power and control.
Mastering the Power Zone:
The power zone is the region where the kite generates the most lift and power. It is essential to understand the power zone’s geometry to optimize jumping performance. The power zone is divided into two sub-zones: the power zone and the power band.
1. Power Zone:
The power zone is the central area of the power band, where the kite is most effective in generating lift. To maximize the power zone, riders should position the kite in the middle of the wind window, ensuring it is parallel to the water surface. This allows the kite to harness the full potential of the wind and achieve higher jumps.
2. Power Band:
The power band is the area surrounding the power zone, where the kite’s performance gradually diminishes. Riders should avoid staying in the power band for extended periods, as it can lead to reduced power and control during the jump.
Geometry of the Jump:
The geometry of the jump is crucial in achieving a successful and exhilarating jump. Here are some key points to consider:
1. Kite Position: Position the kite in the middle of the wind window, ensuring it is parallel to the water surface. This allows the kite to generate maximum power and lift.
2. Angle of Attack: Maintain a slight angle of attack (the angle between the kite’s leading edge and the wind) to optimize lift and control during the jump.
3. Kite Leash Length: Adjust the kite leash length to control the kite’s movement and maintain a stable jump. A shorter leash provides more control, while a longer leash allows for more freedom and amplitude.
4. Body Position: Keep your body in a streamlined position, with your weight centered over your board. This ensures maximum stability and control during the jump.
Conclusion:
Mastering the wind window power zone geometry for jumping is essential for kitesurfers looking to enhance their performance and enjoy the thrill of soaring through the air. By understanding the front, middle, and back zones of the wind window, as well as the power zone and power band, riders can optimize their kite positioning and execute jumps with precision and control. Remember to practice and experiment with different techniques to find the perfect combination for your style and skill level. Happy kitesurfing!